Battery switch on travel trailer function is crucial for managing your RV’s power. Understanding how this simple yet vital component works can save you headaches (and potentially a dead battery!). This guide breaks down the different types of battery switches, how to safely connect and disconnect your batteries, troubleshoot common problems, and even how to upgrade your system. We’ll cover everything from basic wiring diagrams to advanced maintenance tips, ensuring you’re fully equipped to handle your travel trailer’s electrical system.
We’ll explore the various types of switches, like the common 1-2-both and 1-2-off configurations, and delve into their pros and cons. Safety is paramount, so we’ll detail the proper procedures for connecting and disconnecting batteries to prevent sparks and short circuits. Troubleshooting is also covered, with clear steps to diagnose and fix common issues like no power or blown fuses.
Finally, we’ll discuss integrating your battery switch with other electrical components and provide maintenance tips to keep your system running smoothly for years to come.
Understanding Battery Switch Functionality in Travel Trailers

A battery switch is a crucial component in your travel trailer’s electrical system, allowing you to manage power flow from your trailer batteries and to potentially connect to shore power. Understanding how it works is essential for safe and efficient use of your RV. Proper use prevents accidental battery drain and protects your sensitive electronics.
Battery Switch Types
Travel trailers typically utilize battery switches to control the flow of power from one or more batteries. The most common types are the 1-2-Both and 1-2-Off switches. A 1-2-Both switch allows you to select power from battery 1, battery 2, or both batteries simultaneously. A 1-2-Off switch offers the same battery selection options but also includes an “Off” position to completely disconnect both batteries, preventing parasitic drain when the trailer is stored for extended periods.
Some more advanced systems might incorporate additional switches for specific circuits or appliances.
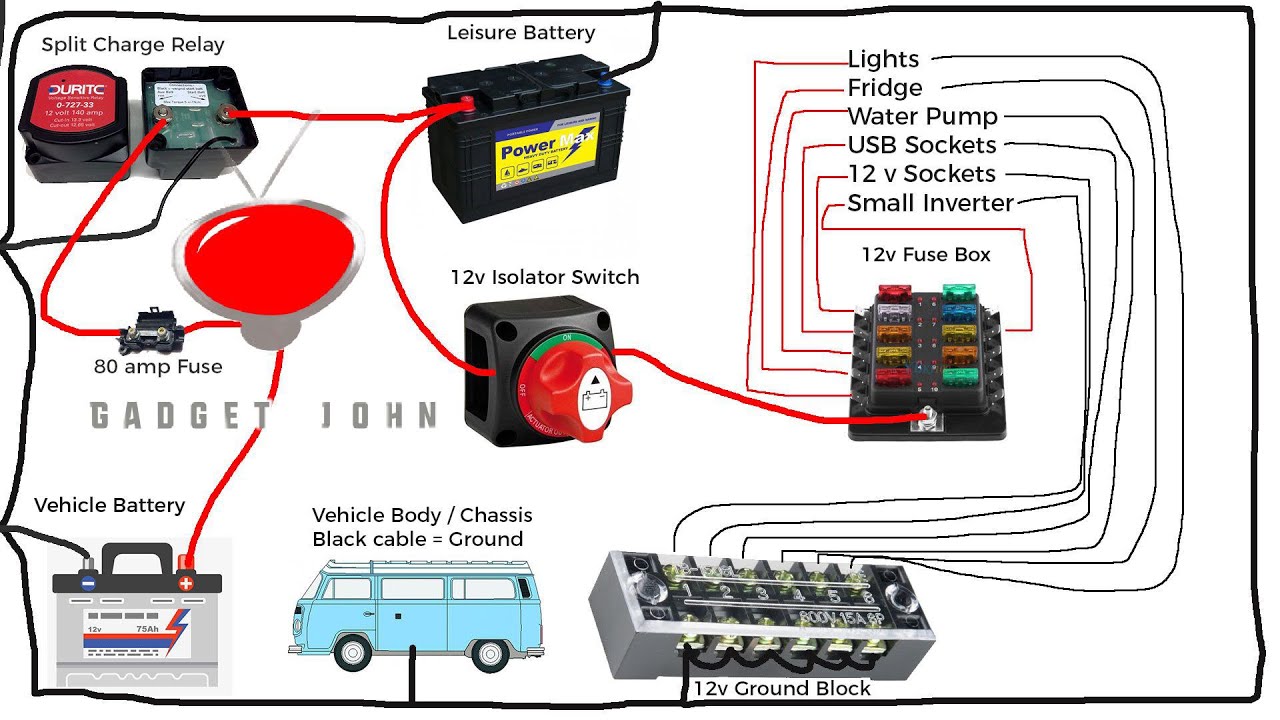
Typical Battery Switch Wiring Diagram
A typical setup involves two batteries connected to the switch, and the switch then connects to the trailer’s 12V DC system. Imagine a simple diagram: Two batteries (Battery 1 and Battery 2) are each connected to a separate terminal on the battery switch. The output terminal of the battery switch then feeds the 12V DC power to the trailer’s electrical system (lights, water pump, etc.).
A ground wire connects all components to the trailer’s chassis, completing the circuit. This allows the user to select which battery or batteries supply power to the trailer. More complex setups might include fuses or circuit breakers for added safety.
Comparison of Battery Switch Types
| Battery Switch Type | Advantages | Disadvantages |
|---|---|---|
| 1-2-Both | Simple to use; allows for using either battery individually or both simultaneously for increased power; good for short-term storage. | No “Off” position; potential for complete battery drain if left in the “Both” position for extended periods without use or charging. |
| 1-2-Off | Provides a complete “Off” position to prevent parasitic drain during storage; safer for long-term storage. | Slightly more complex to operate; requires an extra step to turn the batteries off completely. |
Connecting and Disconnecting Batteries
Properly connecting and disconnecting your travel trailer batteries using a battery switch is crucial for safety and preventing damage to your electrical system. A battery switch allows you to isolate your batteries from the trailer’s electrical system, preventing accidental drain and potential hazards. This section will guide you through the process.Connecting and disconnecting your batteries involves manipulating a switch, usually located near your battery bank.
Safety precautions are paramount to prevent sparks, short circuits, and potential injury. Always remember to disconnect the negative terminal first and reconnect it last.
Battery Connection Procedure
Before you begin, ensure the battery switch is in the “OFF” position. This isolates the batteries from the trailer’s electrical system, preventing accidental shorts. Locate your battery switch; it’s typically a multi-position switch with labels indicating different battery configurations (e.g., “Both,” “Battery 1,” “Battery 2,” “Off”). Visually inspect the terminals and wires for any signs of damage or corrosion.
Clean any corrosion with a wire brush and baking soda solution if necessary. This ensures a good electrical connection.Now, carefully turn the battery switch to the desired position (“Both” to connect both batteries, “Battery 1” or “Battery 2” to connect only one). You should hear a distinct click as the switch engages. After the switch is in the correct position, you can proceed to check your trailer’s electrical system.
If using a battery monitor, verify that the voltage reading reflects the combined or individual battery voltage, confirming a successful connection. A multimeter can also be used to verify voltage and current if needed.
Battery Disconnection Procedure
To disconnect your batteries, begin by turning off all appliances and electronics in your trailer. This prevents surges and potential damage to your electrical components. Then, carefully turn the battery switch to the “OFF” position. This isolates the batteries from the trailer’s electrical system, preventing accidental short circuits and power drain. Again, you should hear a distinct click confirming the switch has moved to the “OFF” position.
After switching off, you should verify the lack of power by checking the functionality of appliances and lights in the trailer.
Safety Precautions, Battery switch on travel trailer function
Several key safety precautions should be followed during battery connection and disconnection:
- Always wear safety glasses to protect your eyes from potential sparks or acid splashes.
- Use insulated tools to prevent accidental short circuits. Never use metal tools that could conduct electricity.
- Ensure the area is well-ventilated to avoid inhaling harmful battery fumes.
- Never work on batteries in a wet or damp environment.
- Disconnect the negative (-) terminal first and reconnect it last. This prevents accidental short circuits and protects against electrical shock.
- If you encounter any difficulty, consult a qualified RV technician.
Troubleshooting Common Battery Switch Issues
Dealing with a faulty battery switch in your travel trailer can be frustrating, but with a systematic approach, you can usually pinpoint and fix the problem. Understanding the common issues and how to troubleshoot them will save you time and potential headaches on the road. This section Artikels some of the most frequent problems and provides step-by-step solutions.
Battery switch problems usually manifest as a complete lack of power or inconsistent power delivery to your trailer’s systems. Sometimes, a blown fuse is the culprit, but other issues might require a more in-depth investigation.
No Power to the Trailer
This is the most obvious sign of a battery switch problem. Before jumping to conclusions, ensure your trailer’s main battery is charged. Use a multimeter to check the battery voltage. If the battery is dead, charging it is the first step. If the battery is charged but there’s still no power, the problem likely lies within the battery switch itself or its related wiring.
Check the switch’s connections for corrosion or loose wires. Clean any corrosion and tighten loose connections. If the problem persists, carefully inspect the wiring leading from the battery to the switch and from the switch to the trailer’s electrical system for breaks or damage. A visual inspection is crucial, as damaged wires can be difficult to detect without careful examination.
If a break is found, repair or replace the affected wiring. Finally, if everything else checks out, the switch itself may be faulty and need replacement.
Blown Fuses
Blown fuses are a common cause of electrical problems in travel trailers. Fuses are designed to protect the electrical system from overloads. If a fuse blows, it indicates an issue somewhere in the circuit. Locate the fuse box for your trailer’s battery switch. Each fuse will have an amperage rating printed on it.
Visually inspect the fuses; a blown fuse will typically show a broken filament inside the glass or plastic casing. Replace any blown fuses with fuses of the same amperage rating. If a replacement fuse blows immediately after being installed, it indicates a short circuit in the system. Do not simply keep replacing the fuse; find and repair the short circuit before replacing the fuse again, otherwise you risk causing damage to other components.
Tracing the circuit from the battery switch to the point where the fuse blows will help locate the short.
Intermittent Power
If you’re experiencing intermittent power to your trailer, this suggests a more complex issue. This could be due to loose connections, corroded terminals, or a failing battery switch. Start by thoroughly checking all connections related to the battery switch for corrosion and tightness. Pay close attention to the connections at both the battery and the switch itself.
Clean any corroded terminals with a wire brush and apply a corrosion inhibitor. If the problem persists, the switch itself might be faulty and require replacement. A failing switch may not always make a complete break in the circuit, leading to intermittent power.
Troubleshooting Flowchart
A systematic approach is crucial when troubleshooting battery switch malfunctions. The following flowchart Artikels a logical sequence of steps to diagnose the problem:
[Imagine a flowchart here. The flowchart would start with “No Power to Trailer?” A “Yes” branch would lead to “Check Battery Voltage,” then “Battery Charged?” A “Yes” branch would lead to “Check Battery Switch Connections,” then “Loose/Corroded Connections?” A “Yes” branch would lead to “Clean/Tighten Connections,” then “Problem Solved?” A “No” branch would lead to “Check Wiring for Breaks,” then “Wiring Damaged?” A “Yes” branch would lead to “Repair/Replace Wiring,” then “Problem Solved?” A “No” branch would lead to “Replace Battery Switch.” A “No” branch from “Battery Charged?” would lead to “Charge Battery.” A “No” branch from “Problem Solved?” at each stage would loop back to the previous step or a relevant preceding step.
A “No” branch from “No Power to Trailer?” would lead to “Check Fuses.” The fuse check would follow a similar branching logic as the power check, ultimately leading to either “Problem Solved” or the need to address a short circuit.]
Battery Switch and Electrical System Integration
Your travel trailer’s battery switch acts as a central control point, dictating how power flows between your batteries and the rest of your electrical system. Understanding this interaction is key to preventing electrical issues and maximizing your off-grid power capabilities. This section will detail how the switch interacts with crucial components like the converter and inverter.The battery switch is the gatekeeper of your trailer’s DC power.
So, you’re an audiophile who travels? Awesome! Check out this guide on building the perfect audiophile travel setup for those on-the-go listening experiences. It covers everything from portable DACs to noise-canceling headphones. But if you’re looking for something more focused on lightweight, high-quality solutions, then you might want to explore another resource dedicated to audiophile travel setups that prioritize portability without compromising sound quality.
Remember to consider your budget and travel style when making your choices!
With the switch engaged, power flows freely; disengaged, it effectively isolates the batteries. This seemingly simple action has significant implications for how your various electrical systems operate.
Power Flow with the Battery Switch Engaged
With the battery switch in the “on” position, your house batteries are directly connected to the trailer’s DC electrical system. This allows power to flow from the batteries to various components, including the 12V lights, water pump, and other appliances. Furthermore, the converter can charge the batteries from the shore power or generator. If an inverter is present, it can draw power from the batteries to supply 120V AC power to the outlets.
This setup enables all 12V and (inverter-dependent) 120V systems to operate simultaneously.
- Batteries: Provide 12V DC power to the system.
- Converter: Charges the batteries from shore power or generator, and also converts 12V DC to 120V AC for some appliances. This conversion happens even with the battery switch off if the shore power is connected.
- Inverter: Converts 12V DC battery power to 120V AC power for appliances needing AC power. The inverter only works when the battery switch is on and the batteries have sufficient charge.
- 12V Appliances: Receive direct power from the batteries, such as lights, water pump, and fans.
Power Flow with the Battery Switch Disengaged
When the battery switch is off, the batteries are completely isolated from the rest of the electrical system. This prevents accidental draining of the batteries while the trailer is stored or not in use. However, it also means that none of the 12V appliances will work, and the inverter will be unable to provide AC power. The converter, however, will still function, charging the batteries if shore power or generator power is connected.
So, you’re an audiophile who travels? Awesome! Check out this guide on audiophile travel setups for tips on keeping your sound quality high on the go. It covers everything from portable DACs to noise-canceling headphones. But if you’re looking for something more focused on lightweight, high-fidelity options, then you should definitely explore audiophile travel setups for smaller, more easily packed systems.
Remember, quality sound doesn’t have to be bulky!
This is a safety feature preventing accidental discharge of your batteries.
- Batteries: Isolated from the rest of the system; cannot power any appliances.
- Converter: Continues to charge the batteries from shore power or generator power if connected, regardless of the battery switch position. It does not power any 12V appliances, however.
- Inverter: Inactive, unable to supply AC power because it is not receiving power from the batteries.
- 12V Appliances: Do not receive power and will not function.
Maintaining the Battery Switch and System
Keeping your travel trailer’s battery switch and its associated electrical system in top shape is crucial for reliable power and a smooth camping experience. Regular maintenance prevents unexpected breakdowns and extends the lifespan of your valuable components. Neglecting maintenance can lead to corrosion, poor connections, and ultimately, battery failure.Proper maintenance involves a combination of regular inspections, cleaning, and preventative measures.
A consistent schedule, along with understanding the telltale signs of potential problems, will ensure your system remains reliable for years to come.
Battery Switch and System Maintenance Schedule
A proactive approach to maintenance is key. The frequency of inspection and cleaning will depend on your usage and the environment your travel trailer is exposed to. Harsh climates with high humidity or salt air will require more frequent attention.
- Monthly Inspection: Visually inspect the battery switch for any signs of corrosion, loose connections, or damage. Check the battery terminals for corrosion as well. Tighten any loose connections.
- Semi-Annual Cleaning: Perform a thorough cleaning of the battery switch and connections (detailed steps are Artikeld in the next section).
- Annual Deep Cleaning and Inspection: This involves a more comprehensive inspection, including checking all wiring for damage or wear, and potentially applying a corrosion inhibitor to the terminals and switch.
Cleaning and Inspecting Battery Switch Connections
Cleaning the battery switch and its connections is essential to maintaining optimal performance. Corrosion buildup can significantly impede current flow, leading to reduced power and potentially damage to your batteries or other components.
- Disconnect the Batteries: Always disconnect the negative (-) battery terminal first before beginning any cleaning or maintenance. This prevents accidental short circuits.
- Prepare Cleaning Solution: A baking soda and water paste is an effective and safe cleaning solution. Mix baking soda with a small amount of water to create a paste. Alternatively, you can use a commercial battery terminal cleaner.
- Clean the Connections: Apply the cleaning solution to the battery terminals and the switch contacts. Use a wire brush or a dedicated terminal cleaning tool to scrub away any corrosion. For stubborn corrosion, you might need to repeat the application.
- Rinse and Dry: After cleaning, rinse the area with clean water and allow it to dry completely before reconnecting the batteries. A clean cloth or compressed air can help speed up the drying process.
- Reconnect the Batteries: Once everything is dry, reconnect the battery terminals, ensuring a tight connection. Remember to connect the positive (+) terminal last.
Extending the Lifespan of the Battery Switch and Batteries
Several practices contribute to extending the life of your battery switch and batteries themselves. By following these tips, you can maximize their performance and longevity.
- Use a Battery Maintainer: When your travel trailer is stored for extended periods, use a battery maintainer to keep the batteries charged and prevent sulfation. This is especially important in colder climates.
- Regularly Check Battery Water Levels (if applicable): For flooded lead-acid batteries, regularly check the water levels and add distilled water as needed. Never overfill.
- Proper Ventilation: Ensure adequate ventilation around the batteries to prevent the buildup of explosive gases.
- Avoid Deep Discharges: Deeply discharging your batteries frequently can significantly shorten their lifespan. Try to avoid letting them drop below 50% charge.
- Choose the Right Battery Type: Select a battery type that’s appropriate for your needs and usage patterns. Consider AGM or lithium-ion batteries for longer lifespan and better performance.
Upgrading or Replacing a Battery Switch: Battery Switch On Travel Trailer Function
Upgrading or replacing your travel trailer’s battery switch can significantly improve your electrical system’s performance and reliability. A faulty switch can lead to power problems, while an upgrade might offer features like improved amperage handling or more sophisticated control. This section details the process of both replacing a faulty switch and upgrading to a better model.Replacing a faulty battery switch is a relatively straightforward process, but safety is paramount.
Always disconnect the battery’s negative terminal before starting any work on the electrical system. This prevents accidental shocks and short circuits. Choosing the right replacement is crucial; ensure the new switch has the same amperage rating as the old one, or higher if you’re planning future upgrades.
Replacing a Faulty Battery Switch
This process involves disconnecting the old switch, carefully noting its wiring configuration, and installing the new switch in its place, maintaining the same wiring scheme. Failure to accurately replicate the wiring can result in electrical malfunctions or even damage to your trailer’s electrical system.
- Disconnect the Battery: Disconnect the negative (-) terminal of your trailer’s battery. This is the most crucial safety step.
- Remove the Old Switch: Carefully remove the old battery switch from its mounting location. Take photos or make detailed notes of the wiring connections before disconnecting any wires. Pay close attention to which wire goes to which terminal. Commonly, you’ll find terminals labeled for the battery, the chassis, and various loads (like the camper’s interior lights).
- Prepare the New Switch: Ensure the new switch is rated for at least the same amperage as the old one, preferably higher if you anticipate increasing your electrical load in the future. Most switches have clearly labeled terminals.
- Install the New Switch: Mount the new switch securely in the same location as the old one. Use the photos or notes from step 2 to reconnect the wires to the correct terminals on the new switch. Double-check your work before proceeding.
- Reconnect the Battery: Once all connections are verified, reconnect the negative (-) terminal of the battery. Test all electrical systems to ensure everything is functioning correctly.
Upgrading to a Different Type of Battery Switch
Consider factors such as amperage rating, features (like individual circuit breakers or remote control capabilities), and mounting style when upgrading. A higher amperage switch allows for more power draw, accommodating additional appliances or larger batteries. A switch with individual circuit breakers offers better protection against overloads and short circuits, improving safety. Some newer switches offer remote control options for convenient battery management.
Upgrading a Battery Switch System: A Step-by-Step Guide
Upgrading involves a similar process to replacement, but you might need to add new wiring or components depending on the type of upgrade. For example, adding a remote switch will require running new wiring from the main switch to the remote location.
- Assess Your Needs: Determine the type of upgrade you require (e.g., higher amperage, additional features). Consider your current and future electrical demands.
- Gather Materials: Obtain the new battery switch, any necessary wiring, connectors, and mounting hardware. Ensure the new switch’s amperage rating meets or exceeds your needs.
- Plan the Wiring: Sketch a wiring diagram showing the new switch’s connections and any new wiring needed. This is especially crucial for complex upgrades involving multiple batteries or additional features.
- Disconnect the Battery: Disconnect the negative (-) terminal of your battery before starting any work.
- Install the New Switch and Wiring: Install the new switch and run any necessary new wiring, following your wiring diagram. Use appropriate wire gauges to handle the amperage.
- Test the System: After completing the installation, reconnect the battery and thoroughly test all electrical systems to ensure everything is working correctly.
Diagram Description (Example): A simple diagram might show the battery’s positive (+) terminal connected to the switch’s input, the switch’s output connected to the trailer’s main power bus, and various loads (lights, appliances) connected to the bus. A more complex diagram might include multiple batteries, individual circuit breakers, and a remote switch, with wiring pathways clearly indicated.
Mastering your travel trailer’s battery switch is key to a smooth and enjoyable RV experience. By understanding its function, performing proper maintenance, and knowing how to troubleshoot common problems, you can avoid frustrating power outages and extend the life of your batteries and switch. This guide provides the knowledge you need to confidently manage your RV’s electrical system, ensuring you’re always ready for your next adventure.
Remember to always prioritize safety when working with batteries and electricity!
FAQ Guide
What happens if I leave my battery switch in the “off” position?
Leaving the switch in the “off” position completely disconnects the batteries from the trailer’s electrical system, preventing any power drain. This is ideal for long-term storage.
Can I use a battery switch with lithium batteries?
Yes, but some lithium battery systems have built-in protection and may not require a separate battery switch. Check your lithium battery system’s manual for compatibility and recommendations.
How often should I clean my battery switch connections?
Inspect and clean your battery switch connections at least once a year, or more often if you notice corrosion or loose connections. Use a wire brush and baking soda solution to clean the terminals.
My battery switch is making a clicking sound. What’s wrong?
A clicking sound often indicates a faulty switch or a low battery voltage. Check your battery voltage and consider replacing the switch if the problem persists.
